Rarely is a photo coming out of the camera so good that it cannot be improved. Photo managing and editing programs provide a variety of tools for helping to get the best image out of every photo.
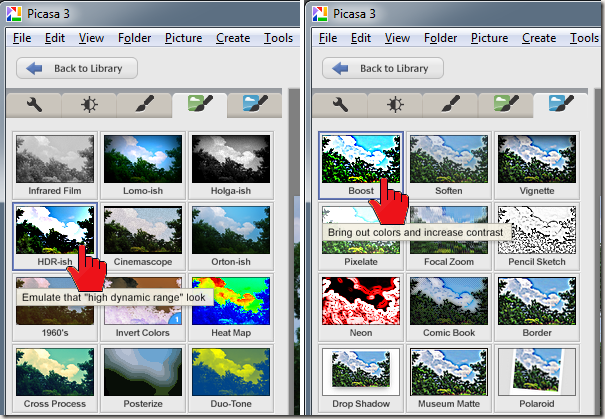
Two effects in Picasa have become mainstays in my “quiver” of tools that I reach for when my initial edits don’t quite reach the “sparkle” I wanted. The effects are “HDR-ish” and “Boost”.
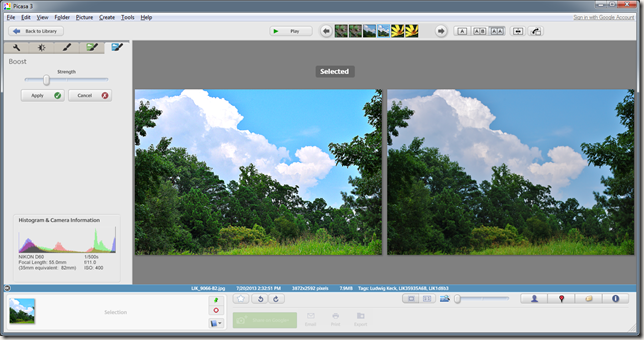
The “Boost” effect increases the contrast of the photo and the saturation of the colors. The “HDR-ish” effect makes dark features lighter and light areas darker and boosts the edges by making the lighter side even lighter and the darker side darker. Both effects are easily overdone. Here is an illustration of Boost:
The modified image is on the left, the original on the right. Note how the colors appear brighter. This can help a lot of photos. The “Strength” slider sets the amount of "Boost”. Going too far will make the picture look unnatural and gaudy, so use it with great care.
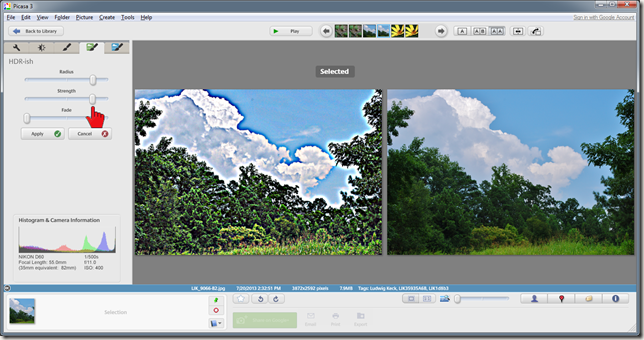
The “HDR-ish” effect is even more easily misused. The “HDR” part of the effect’s name refers to “high dynamic range”, a technique that normally requires several exposures of a scene which are then combined with the dynamic range, the darkest parts to the brightest areas, toned done so the highlights still show detail and the shadows are lightened to show what’s in them. The technique is often overdone with the result that the picture looks more like a drawing than a photo. The Picasa “HDR-ish” effect emulates that garish look.
Here is the same photo with the “HDR-ish” effect applied rather heavily. Note how the lighter clouds are surrounded with a dark edge and how the green trees now have a white halo around them. Clearly for this photo that is too much – unless you want such an effect for some special reason. The “Radius” slider defines how wide the halo effect is and the “Strength” slider controls just that, the strength of the effect.
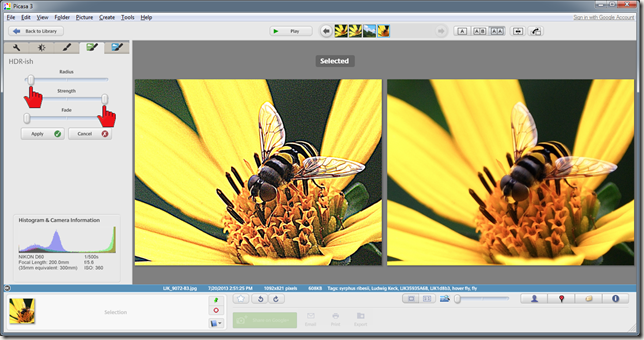
With the “Radius” slider almost all the way to the left, just off the peg so to speak, the halos will be very narrow and almost invisible. However, the effect will sharpen the photo noticeably as you can see in the next illustration.
In the above illustration the “Strength” slider is on the high end and this will cause uniform areas to show “noise”, a grainy appearance like sand on a beach. For best results the strength needs to be applied carefully, rarely more than half-way up.
Below are photos that were made sharper and brighter with these two effects. You can see that this technique might be something that you can also use to bring out the best in some of your photos.
.:.
© 2013 Ludwig Keck


